Advent OGM1 Installation Guide
Important Pre-installation Notes: |
|
This system is designed for installation by a professional installer, but can be easily accomplished by anyone possessing basic tools and common sense. HOWEVER, there are some basic guidelines to follow prior to attempting the installation:
|
|
Installation Guide: |
|
The installation guide shown below comes with every OGM1-READ IT FIRST!
We have customized the guide to call out important notes to pay close attention to while you are doing the installation.
DON’T OVERLOOK THE NOTES BELOW – THEY MAY DETERMINE WHETHER YOUR RADIO AND/OR ACCESSORIES WORK WHEN YOU ARE DONE!
Download a PDF version of the guide.
 |
|
Installation Videos: |
|
|
2007-13 Silverado LTZ w/Bose: OGM1 Installation:
|
2007-13 Silverado LT: OGM1 Installation:
|
|
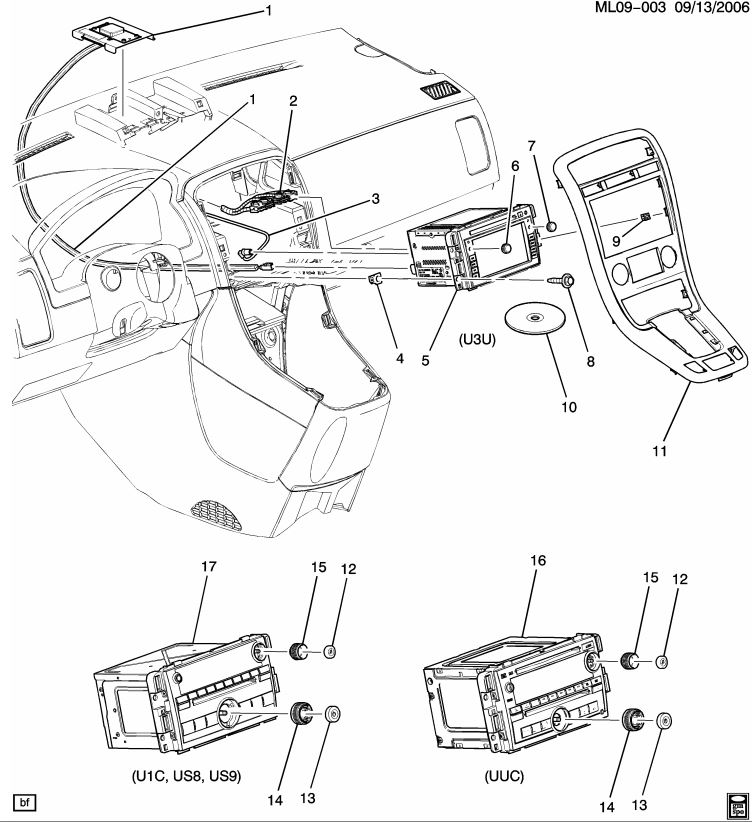
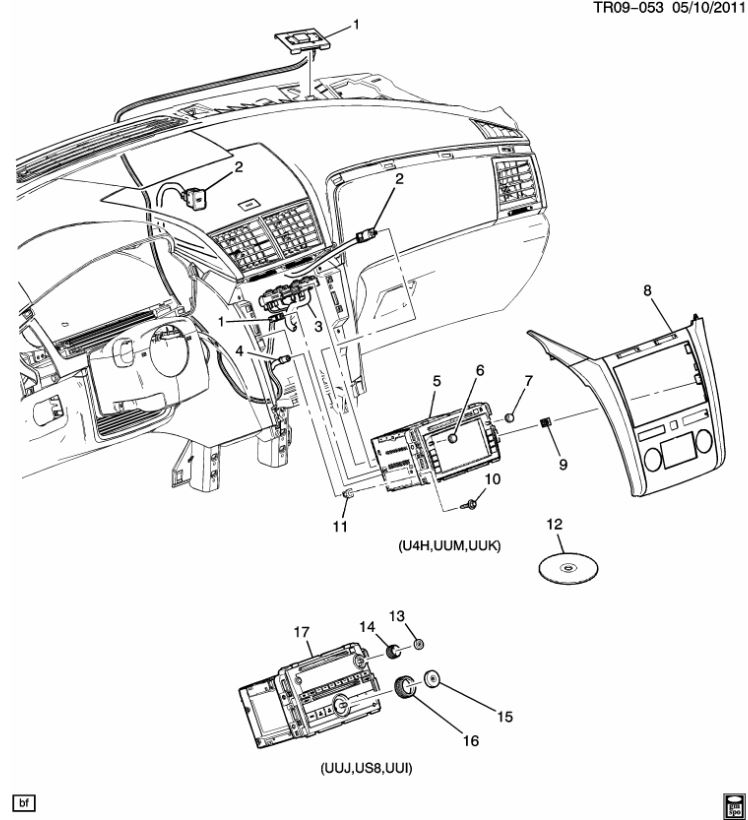
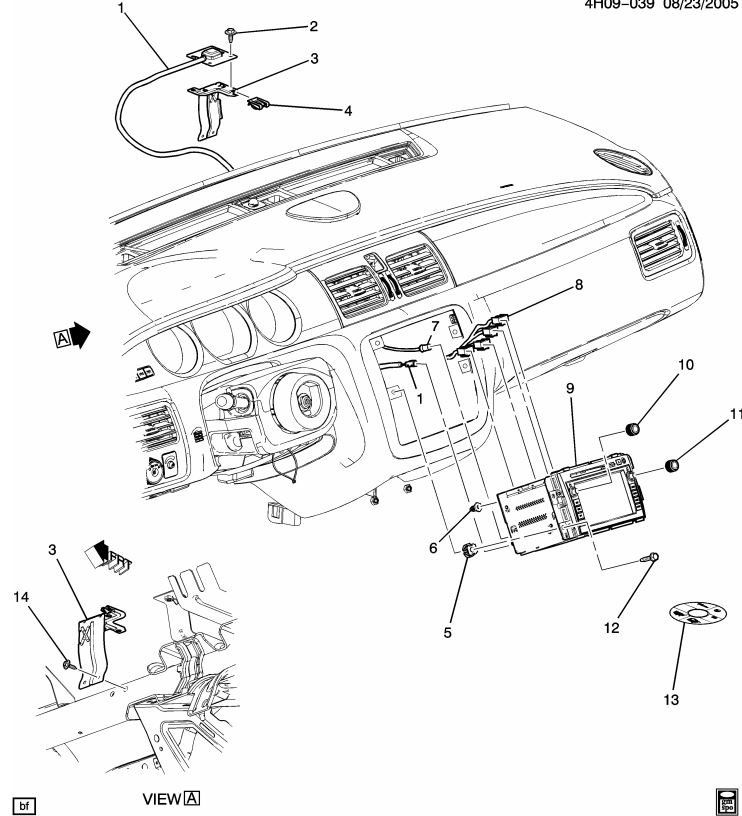
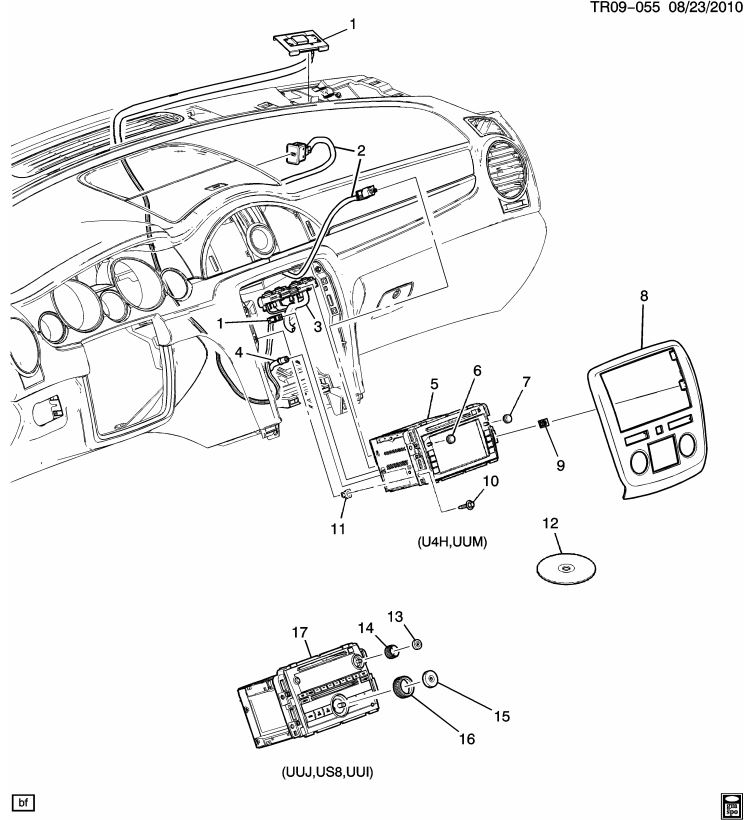
Chevrolet Traverse: Navigation Installation:
|
Chevrolet Impala: Radio Removal:
|
|
Buick Enclave: Radio Removal:
|
GM Truck & SUV: Rosen Headrest DVD Installation:
|
|
2012 Buick Enclave: Rosen AV7900-DD Installation
|
Suburban/Yukon Rear Camera/Mirror Installation:
|
| NOTE: If you do not own a set of plastic trim tools as shown in the videos, Harbor Freight sells a great set for $6.99 | |


Advent OGM1 System SetupWhen installing the Advent “OE” style navigation systems, there are some steps to take to insure that the installation is done correctly:
|
||
 |
||
|
||


|
||
BOSE AMP SETTINGSThe OGM-1 only has the ability to be compatible with the standard non-amplified factory system, or the Bose amplified system. The unit ships in the non-amplified mode, but can be easily changed to the Bose mode. You will be able to tell your system is not in the correct mode if the chimes are MUCH louder than they were on the factory deck.
|
||
DEMO MODEThere is a demo mode that allows the parking brake to be overridden, allowing DVD or iPod video video to be viewed while the vehicle is in motion – this is to be used for demonstration & testing purposes, for off-road use ONLY.
|


Use Factory Bluetooth & Advent Bluetooth at the Same TimePosted by Klyde32 in GM-Trucks.com A/V Forum: I have also discovered something that might help with the members who have asked about the OEM mic integration. I noticed today that while driving around, if I hit the transfer button on the OGM-1, it would transfer the call to the trucks OEM bluetooth. I can only assume that it starts using the factory mic. I have an iPhone 4 so I cannot talk to any other phone, but if you are having issues with the sound quality of the OGM-1 mic, you can use the touchscreen to place the call and have access to your contacts/call logs. Then hit transfer and be able to utilize the factory mic. Of course this is only if you have bluetooth from the factory. I know it is an extra step, but at least gets you back to the factory mic. Again, I have had no issues with sound quality on the mic from the OGM-1, just thought I would share the tip. Use “TRANSFER” button to switch to factory Bluetooth |
MediaLink Pod Mounting Ideas |
||
Bose equipped Silverado/Sierra/Tahoe/Suburban/Yukon: |
||
| We normally mount the MediaLink pod in the center console glovebox mounted vertically on the front wall – we drill a 3/4″ hole to run the cabling forward to the deck, then screw the pod to the front wall. NOTE: If you have the factory USB port in the center console and want to retain it, see the section below | ||
 |
 |
 |
| This accomplishes a couple things – it keeps your USB sticks from getting broken off in the factory port (or breaking the port itself – we’ve seen both happen) when you toss something in there without thinking about the USB stick that’s sticking out into the glovebox from the factory USB port. Since the USB stick is now vertical at the far forward edge, it’s VERY unobtrusive. Second, if you tend to leave the iPod cable plugged in, you can go ahead and fill the box with stuff without having to worry that anything will interfere with your USB/AUX plugs. | ||
| LT Style truck: | LT Style truck w/console: | Enclave/Traverse: |
 |
 |
 |
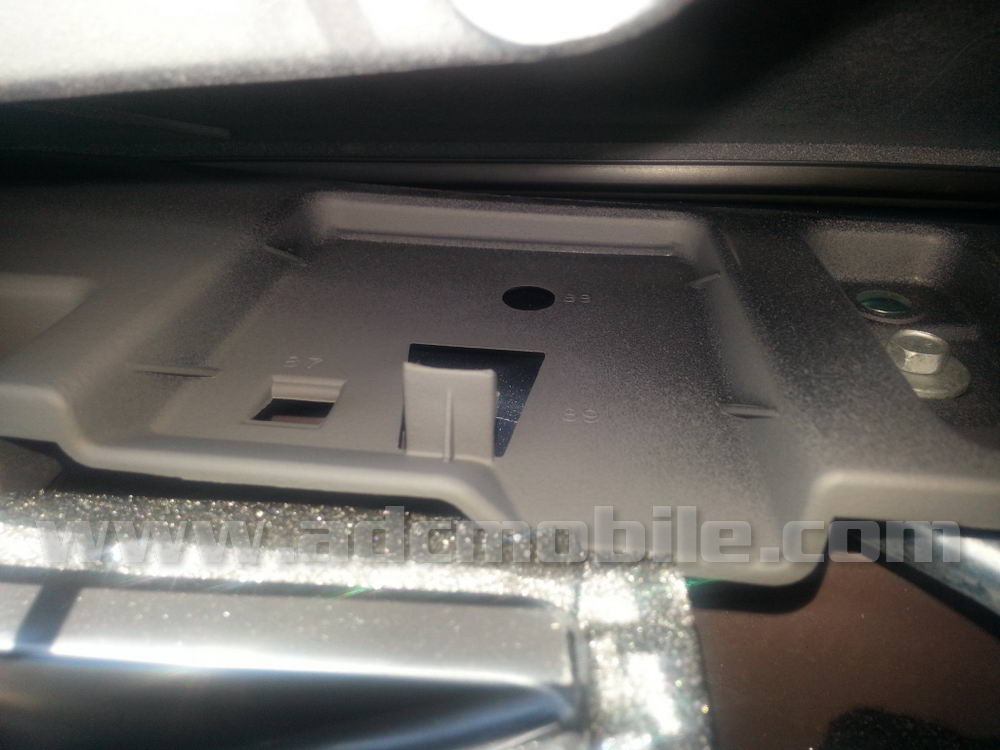
Retain Your Factory GM USB Jack |
||
| GM vehicles generally come equipped with two styles of USB jacks – the round “power port” style for the “LT” style trucks and the rectangular “flush mount” for SUV’s and Bose-equipped trucks. All GM USB jacks can be very easily adapted to work with the OGM1 through the use of adapters or cables. This section deals with adapting your factory USB jack to be used with your OGM1. | ||
LT Style Trucks: |
||
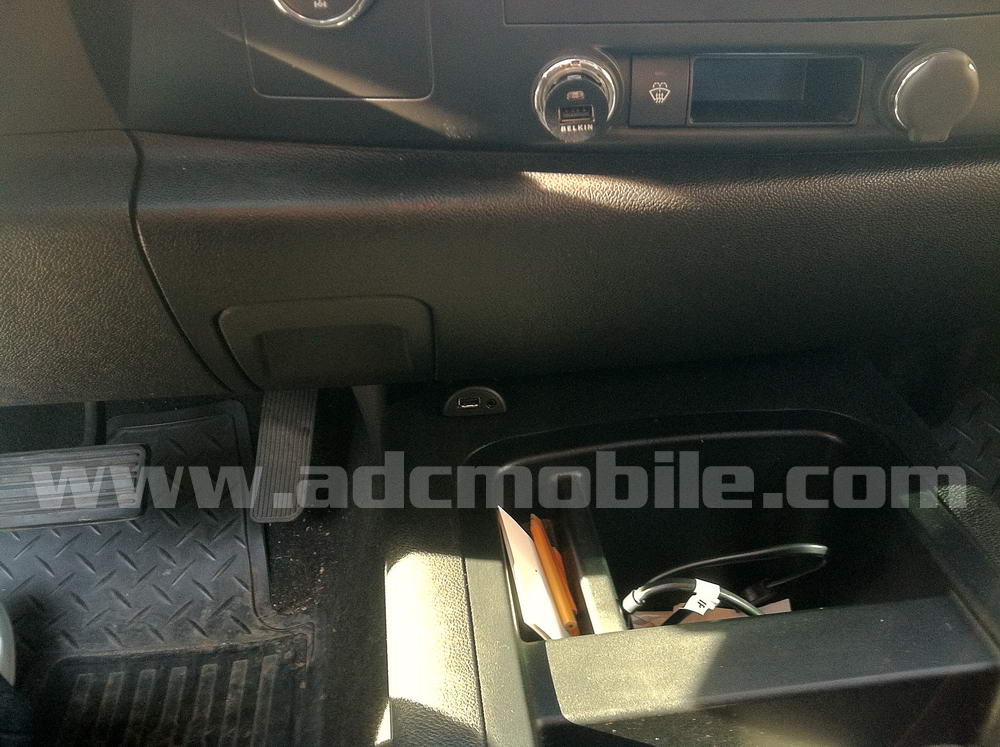
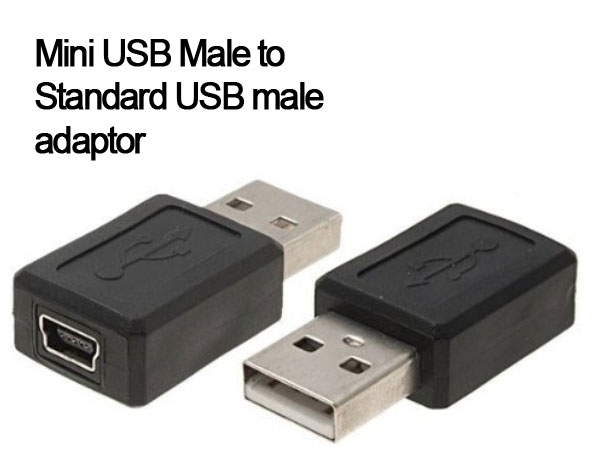
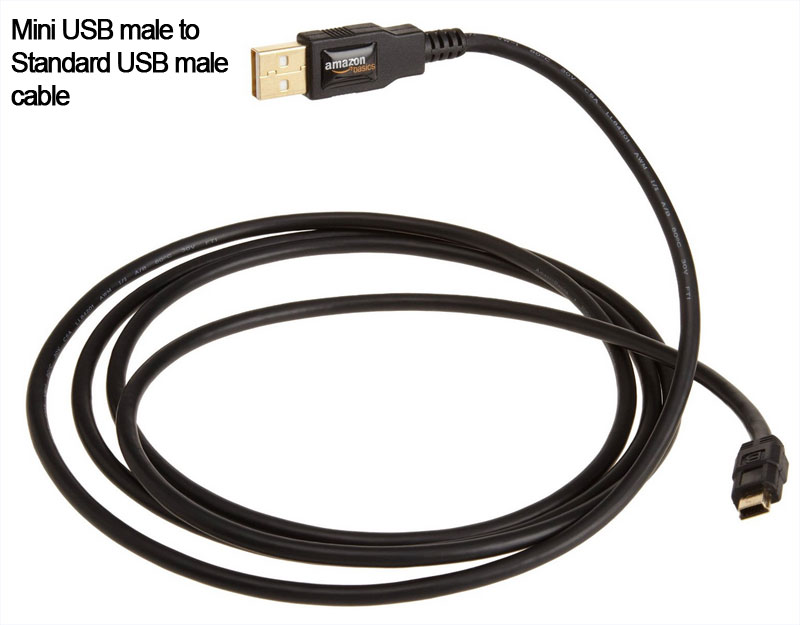
| LT-style trucks will have the USB jack in the power port (below left). The factory USB jack has a female mini-USB jack on the back (center) that connects via a cable that plugs into the back the radio with a mini-USB male connector (right): | ||
 |
 |
 |
In order to retain the factory USB in this system, you can do it two ways:
|
||
 |
 |
|
Bose-Equipped trucks and SUV’s: |
||
| Bose-equipped trucks and SUV’s have a female USB jack mounted in the center glove box or storage box (below left). The factory USB jack has a female mini-USB jack on the back (center) that connects via a cable that plugs into the back the radio with a mini-USB male connector (right): | ||
 |
") |
|
In order to retain the factory USB in this system, you can do it two ways:
|
||
|
 |
|
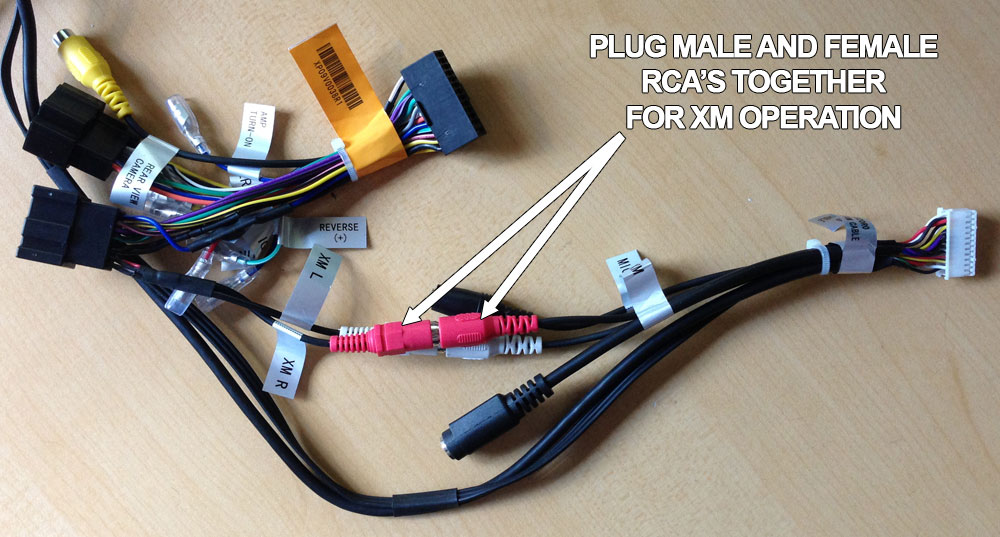
JLINKUSB (iPod video cable) Options with OGM1 |
||
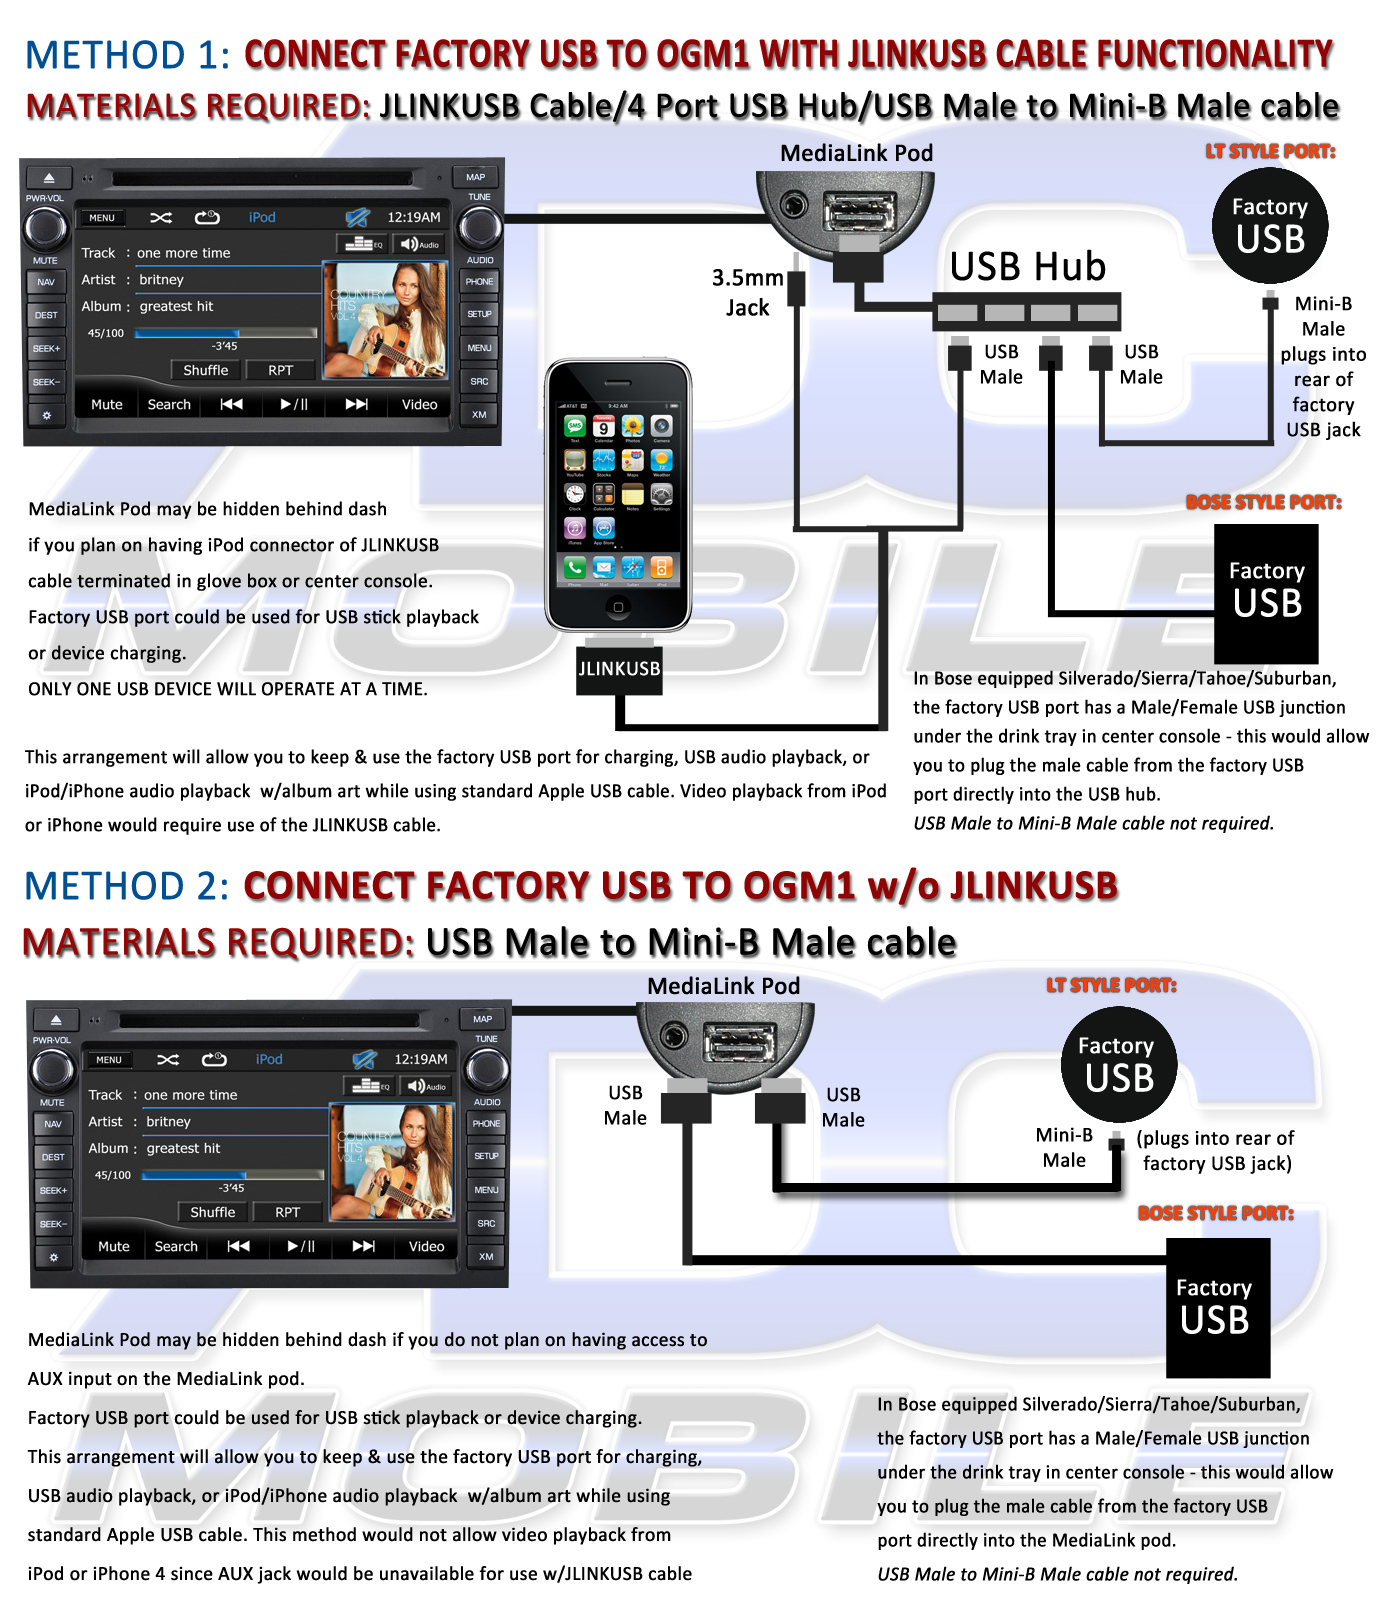 |
||
|
|
RPO Codes |
|
| Chevrolet | GMC
|
 |
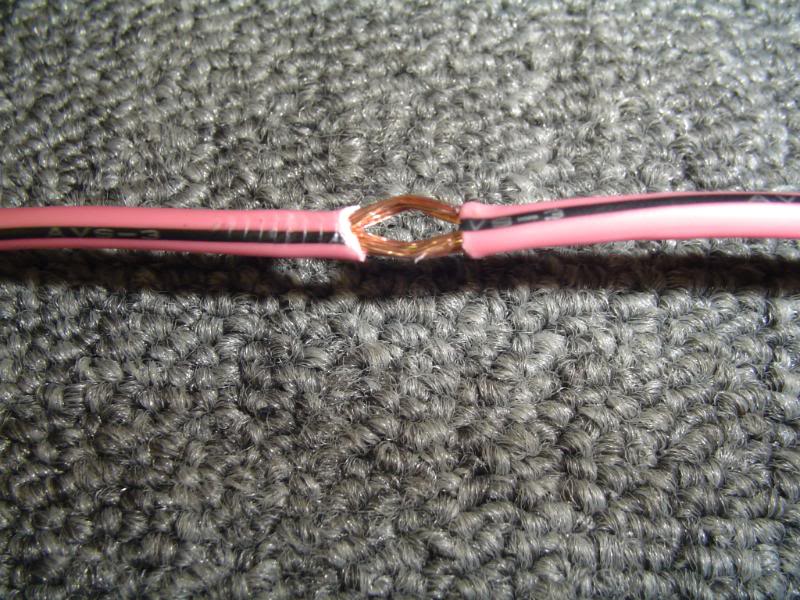
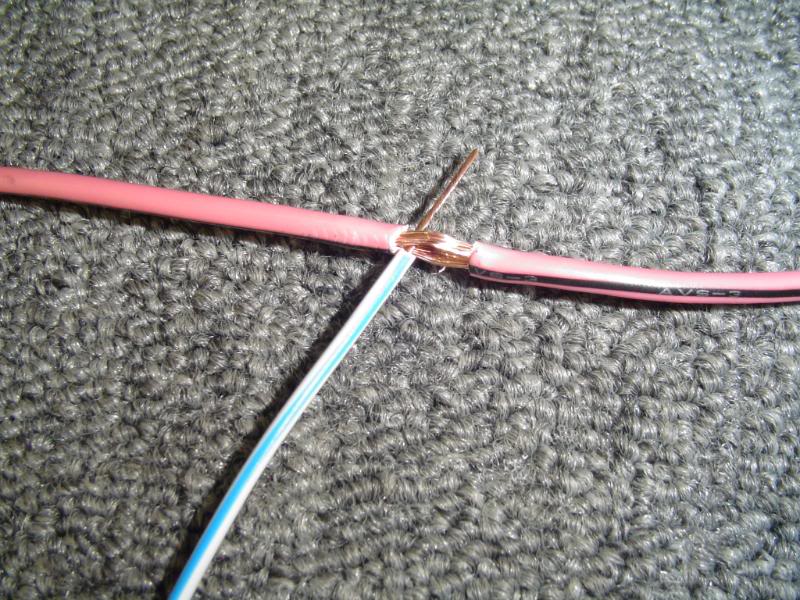
| Posted in GM-Trucks.com by “Sinkhole”: Hello all. I posted something similar to this several years ago but I thought I’d refresh it for everyone. I always see a lot of talk about DIY installations. As an MECP Advanced certified installer most of the issues I see are due to poor installs and bad wiring connections. I just thought I post a quick little tutorial on how to make proper wiring connection, called a military splice, for those that are not sure. Many will say a soldered connection is better, but this connection has a few very important advantages over solder joints. Not to say that it is better than a soldered connection just that it has a few advantages with none of the disadvantages. First is a military splice can be undone easily if you choose to remove the equipment from the vehicle. Second you are not working with a high heat source in a confined area, thus there is no risk of accidentally melting the insulation on another wire. Also this connection is as reliable and strong as a solder connection if done properly. | ||
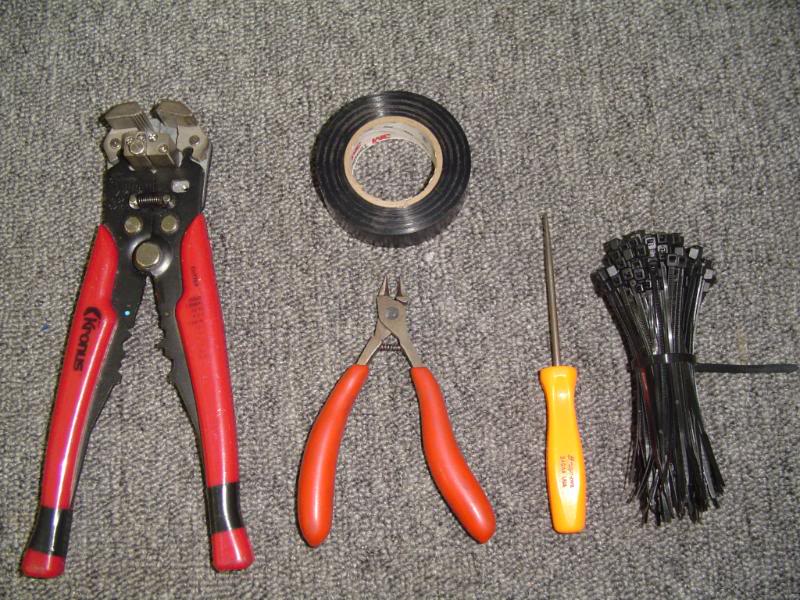 Tools required Tools required |
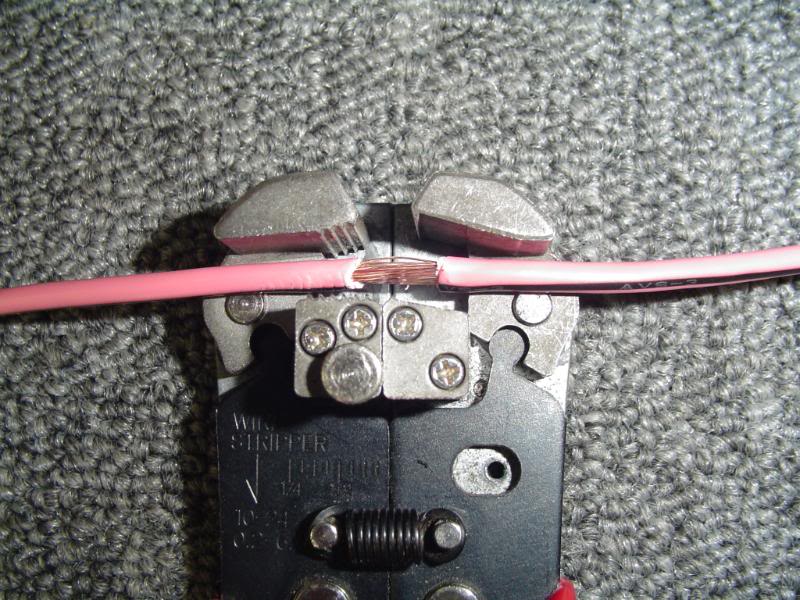 Strip Wire Strip Wire |
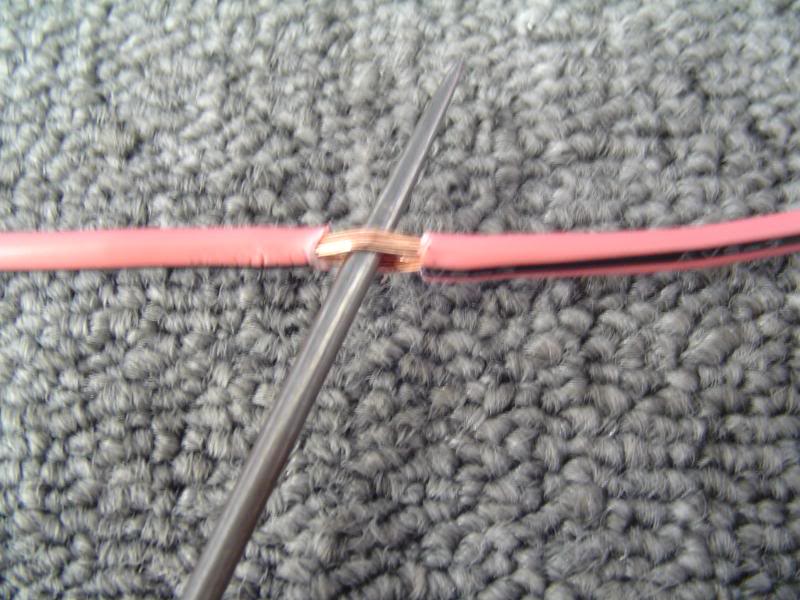 Use awl to open wire Use awl to open wire |
 Wire ready for splice Wire ready for splice |
 Insert new wire into original Insert new wire into original |
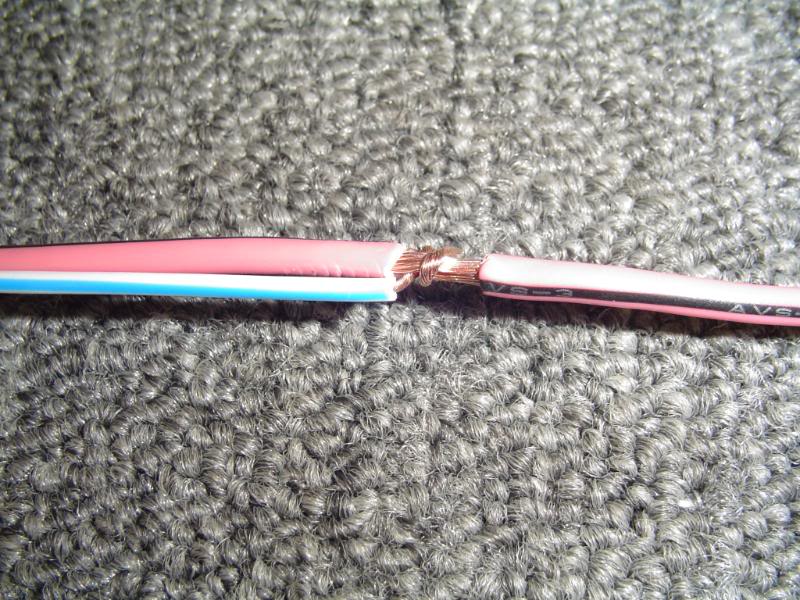 Twist new wire and lay flat Twist new wire and lay flat |
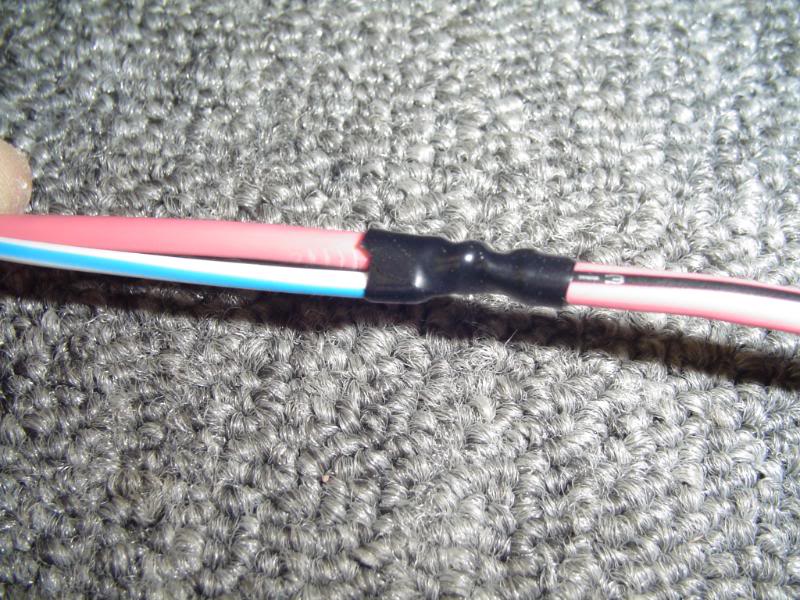 Tape connection Tape connection |
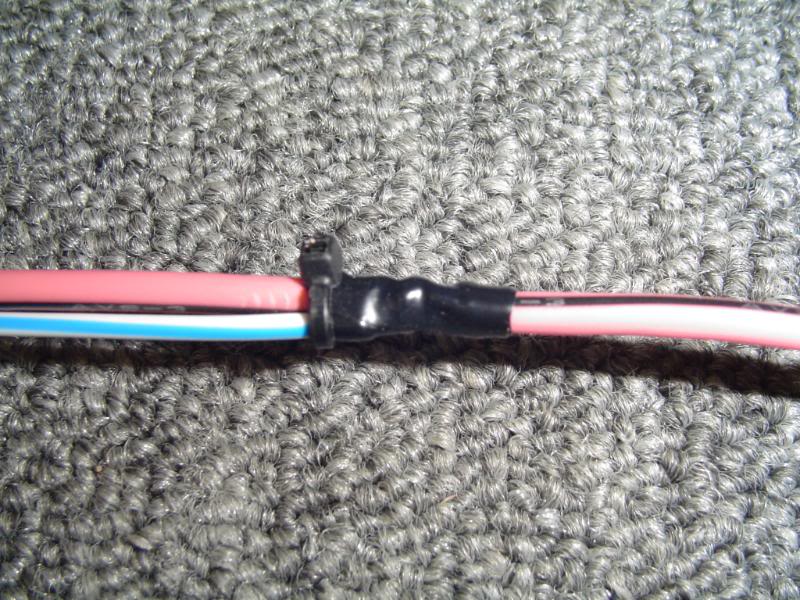 Ziptie to stabilize connection Ziptie to stabilize connection |
 Multiple connections can be done Multiple connections can be done |
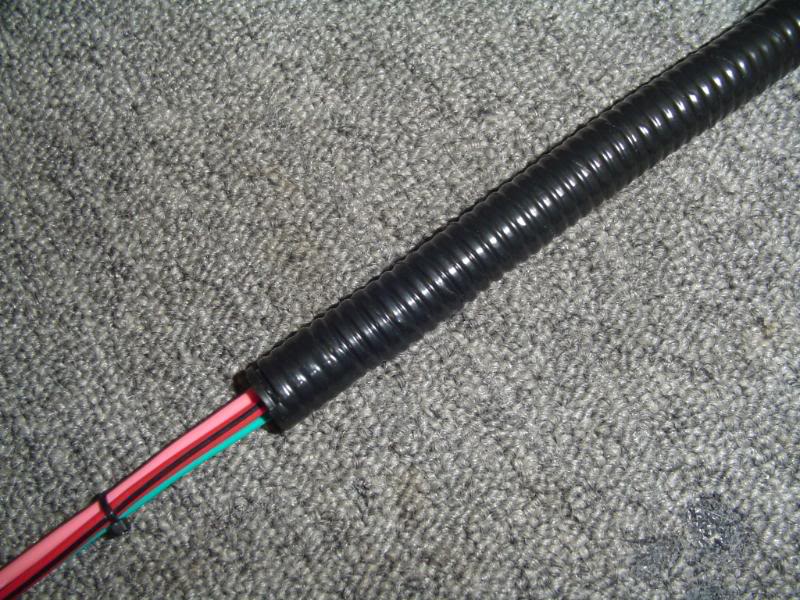 Cover with split loom to protect Cover with split loom to protect |
||
TROUBLESHOOTING TIPS:
| ||
|
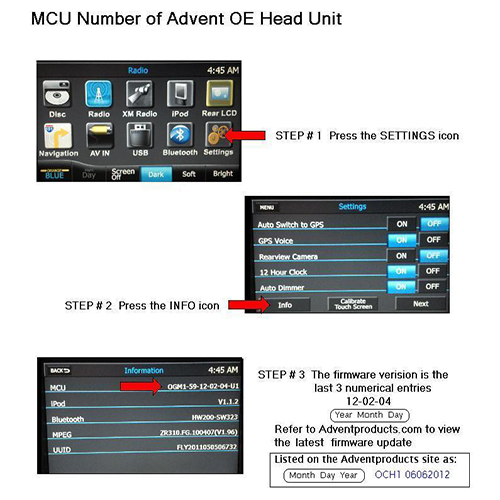
Navigation reports “File Path Does Not Exist”:
| Check Firmware Version:
|
|
BLUETOOTH TROUBLESHOOTING TIPS:The thing to remember is a good Bluetooth connection depends on the device as much as the head unit, and because the device is created to do a lot of things at once, there are many variables that can affect signal quality. Here are some basic troubleshooting steps:
|
||