iGo Primo is just about the most customizable mapping software in the world, with dozens of utilities, skins, add-ons and other tools available on the internet. We love anything that allows you to use the system the way that YOU want to, and some of these tools are pretty amazing in allowing you to change the features and functions of your system.
Everything we link to here is used AT YOUR OWN RISK and we cannot be held liable for any damage to your unit, loss of data or any and all other unintended consequences of using any utility presented. Although we do our best to test everything we present, it’s impossible to try every modification in every scenario.
BEFORE ATTEMPTING ANY MODIFICATIONS TO YOUR MAPPING SOFTWARE YOU MUST BACK UP THE CONTENTS OF THE SD CARD!!!
IF YOU DO NOT KNOW HOW TO BACK UP YOUR DATA, DO NOT ATTEMPT TO USE ANY TOOL OR MODIFICATION PRESENTED HERE!!!
WE ARE NOT RESPONSIBLE FOR ANY DAMAGE OR LOSS OF DATA YOU MAY SUFFER AS A RESULT OF USING ANY TOOL OR METHOD PRESENTED HERE!! WE ARE NOT RESPONSIBLE FOR THE CONTENTS OF ANY LINK PRESENTED HERE – SOME SITES MAY CONTAIN OFFENSIVE CONTENT – FOLLOW THEM AT YOUR OWN RISK!!!
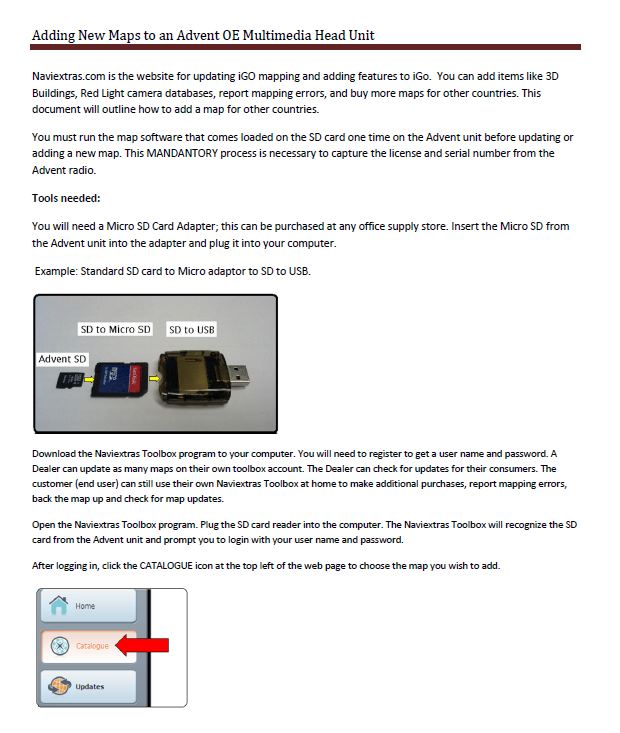
Backup your system using the NaviExtras Toolbox:
The official way to backup, restore and update files on your map SD card is to use the NaviExtras toolbox, available as a free download from www.naviextras.com. This software will allow to backup and restore your data (this should be the first thing you do!), update your existing maps, purchase new maps, and add additional POI’s from your own lists. You will also be able to explore your SD card’s contents:NaviExtras ToolboxDownload the NaviExtras Toolbox
Update Your Maps:
iGo Update ProcedureIf you received the error message “Irregular shutdown detected”, and you cannot exit the program (due to the lack of the exit button) please find the “SAVE” folder on the SD card and delete the “usage.chk” file from it. After that, please connect your device to Naviextras Toolbox again and check whether the message disappeared.
Add Red Light camera locations to your POI’S:
In our opinion, red light cameras are strictly a revenue generating tool for the municipalities that use them and should be eliminated wherever they are used to add revenue instead of increase safety.You now have the ability to add POI’s to your system using the NaviExtras Toolbox, and you can download the locations of over 4,300 red light and speed cameras in the United States from the link below.Red Light POI importRed Light locations show up in POI listAll Red Light Cameras are listed……and are shown on the map.
The Red Light Camera file is available below.
MODIFY YOUR SYS.TXT FILE TO CHANGE STARTUP BEHAVIOR:
The sys.txt file in the root directory of your map SD card contains data allows the user to customize many things, such as skins, fonts, colors, warnings, icons and many other areas of the iGo Primo system. SysConfigurator 1.21 allows you an easy way to change the options with a fairly simple interface:SysConfigurator_1.2.1To use the editor, you will be required to choose the sys.txt file in the root of your SD card, and to save it will require you to rename the old “sys.txt” file first.Do yourself a favor, since there numerous ways to mess up the sys.txt configuration, BACKUP “sys.txt” BEFORE YOU START EDITING IT!The SysConfigurator file is available below.
Add lines to “sys.txt” to override “Accept” warning:
Add these lines to your “sys.txt” file with any text editor. If the [interface] heading is already present, add only the lines under the heading:[interface]
extra_settings=1
drive_carefully=0
Add lines to to “sys.txt” to fix Altitude display:
Add these lines to your “sys.txt” file with any text editor if your altitude display is not reporting correctly (either no altitude display or if it’s fixed at one altitude and won’t update):[gps]
set_messages=0
send_init=0
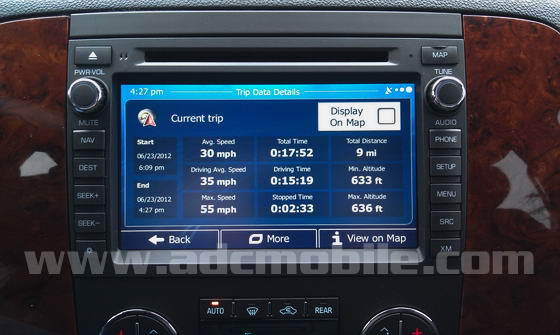
Use Trip Monitor to output track files you can use in Google Earth or Google Maps:
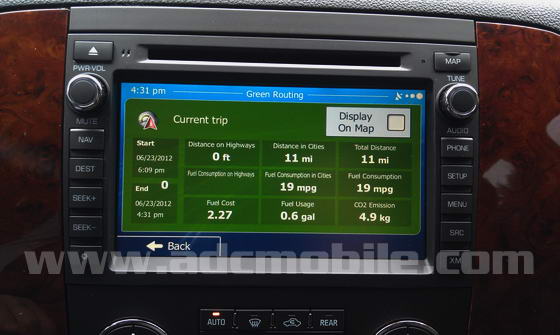
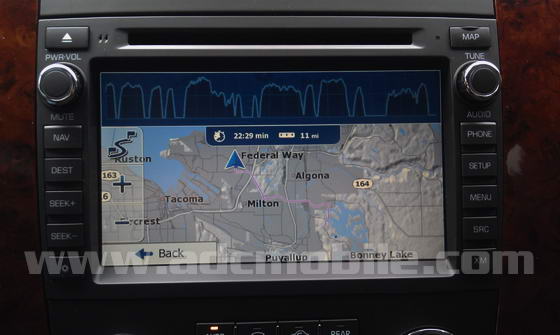
The Trip Monitor function built into iGo Primo is very cool, providing a ton of information on your trips (if you are fairly religious about entering your fuel and mileage data, that is):Also, you have the ability to read the files that are generated by your saved trips and export them for use in Google Maps or Google Earth, etc. The logs are very detailed (saving something like 100 points per mile of your trip) and allow you to use the data whatever way you choose.Here’s how to do it:
Start saving your trips by going to Settings – Trip Monitor, then check “Enable Auto-Saving” and “Save Track Log”
After you’ve saved a trip or two, remove your SD card, then take it to your computer and browse to the “save\TRACKS” directory, where you’ll see the “track001.trk”, “track002.trk” etc. files
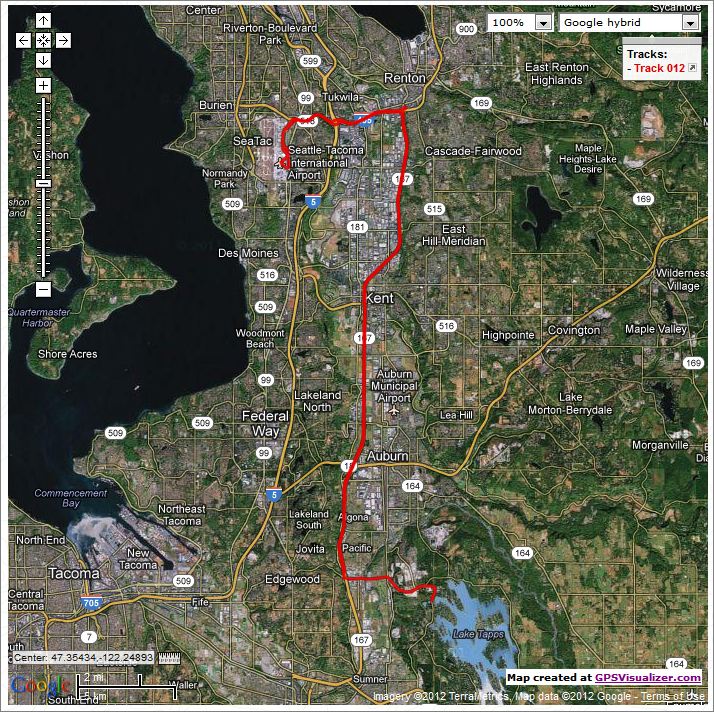
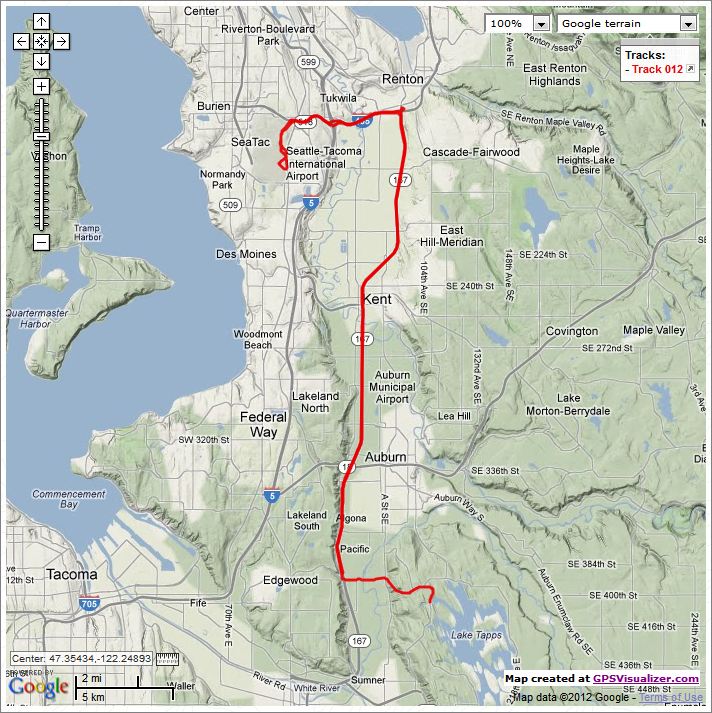
Go to www.gpsvisualizer.com and in the little green box n the middle of the page that says “Get Started Now”, browse to one of your “.trk” files on the SD card and choose which format you want to output the result to:
You will then be able to view and save the trip in Google Maps or Google Earth format, as a PNG or JPG graphic file or a GPX file to import into any other navi like a Garmin or TomTom. (Note that there is no altitude data saved in the trip file)
You can then open the output file or graphic and use it how you see fit or email it to anyone to be able to open:
GOOGLE EARTH FORMAT:GOOGLE MAPS FORMAT:GOOGLE MAPS: TOPOSTANDARD TOPO:Here’s another neat way to visualize your data using the same website:
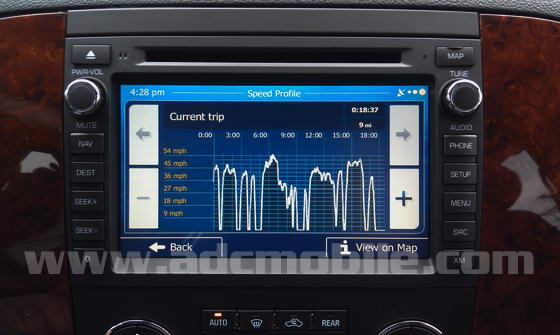
On the GPS Visualizer homepage, choose the links for the detailed input pages and get stuff like this (using the same file as above):
PROFILES: SPEED-DISTANCE
(This would be a great way to keep tabs on your kids if you loan them the truck!)
Change your 3D car in the map display:
iGo Primo allows you to change the icon used for your current location to a 3D car of your choosing. Although the system ships with 10 or so choices, we’ve got 252 more available from the “3D_cars.zip” link shown below.To use any of these additional cars, first download and unzip the “3D_cars.zip” file (contains 252 individual .zip files) to a directory on your computer, then insert your map SD card into your PC (or Mac) so you can access the folders on the card.Navigate to the directory on your PC (or Mac) that contains the unzipped car files, and locate the “content>car” directory on the SD card. Copy any of the new car files (“*****.zip”) that you want to use to the SD card’s “content>car” directory. The next time you fire up iGo Primo, the new vehicles will be available from the “Settings>Map Settings>3D Vehicle Gallery”:3d Car ExampleThe 3D cars file is available below.


 Also, you have the ability to read the files that are generated by your saved trips and export them for use in Google Maps or Google Earth, etc. The logs are very detailed (saving something like 100 points per mile of your trip) and allow you to use the data whatever way you choose.Here’s how to do it:
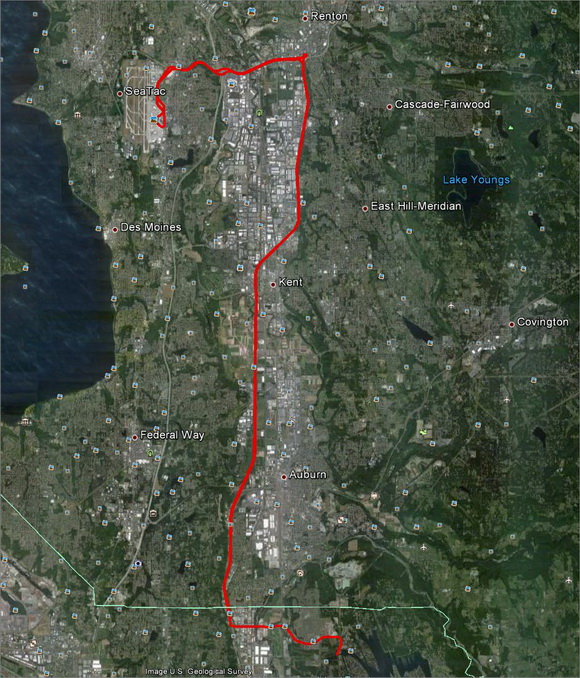 GOOGLE MAPS FORMAT:
 GOOGLE MAPS: TOPO
 STANDARD TOPO:
 Here’s another neat way to visualize your data using the same website:
 (This would be a great way to keep tabs on your kids if you loan them the truck!)

